

You're standing in front of the mirror, deciding whether to braid your hair, try twists, or leave wash day for tomorrow. You want something that looks good through work, errands, and sleep, without having to restyle every morning. Braids and twist styles can fit that rhythm, but the choice involves more than picking a picture you like.
Why Braids and Twists Still Belong in Your Routine
Braiding belongs to a much longer story than the latest hairstyle trend. Its documented African roots extend back roughly 5,000 years; a 2024 U.S. Congressional Record statement places the practice at approximately 3500 BCE and describes communal styling whose patterns communicated age, marital status, rank, and identity, as discussed in this overview of African hairstyling history.
That heritage matters. A braid can be an expression of identity, a shared skill learned from family, and an everyday styling choice at the same time.
Styling at home often starts with a familiar moment of choosing what feels manageable.

What Low-Manipulation Really Means
Low-manipulation means handling your hair less often between styling sessions. Instead of repeatedly combing, brushing, or reshaping loose hair, you keep it arranged in sections and focus on maintaining that arrangement.
For example, you might wear hanging twists during a busy workweek, then unravel them when you want a different look. Someone else might choose braids because they prefer a defined arrangement that doesn't require much morning styling. Neither choice means abandoning cleansing, moisture, or attention to comfort.
Practical rule: Choose a style that simplifies your routine without asking you to ignore how your scalp feels.
Convenience Has Conditions
The word protective can be confusing because it sounds like a promise. A more useful way to think about braids and twists is as styling tools whose suitability depends on how you use them.
Keep these considerations together:
- Installation: Can you create the shape without pulling hard at the roots?
- Added hair: Does the finished style feel manageable rather than burdensome?
- Your schedule: Can you maintain it and make time for careful removal?
- Your next style: Have you left room for a gentler interval afterward?
You don't need a flawless finish to build a thoughtful routine. You need a style that works with your hair, your comfort, and your actual week.
Prep, Tools, and Products Worth Having on Hand
Good preparation makes installation less of a struggle. Start with clean hair, condition the lengths, and detangle in sections while the strands have enough lubrication for your fingers or tool to move without catching.
If your hair feels coated with previous styling products, consider a clarifying wash according to the product directions. Don't make a stronger cleanse an automatic requirement before every style. The aim is a clean starting point, not hair that feels stripped.
Prepare the Strands and Your Toolkit
A gently stretched starting point can make sectioning easier, especially when shrinkage makes neighboring strands difficult to separate. Stretching doesn't have to mean straightening with heat. You can organize conditioned hair into loose sections and let it dry before installation.
Work from the ends upward when detangling, holding the section above the area you're working on. If the comb stalls, pause and separate the snag with your fingers rather than making repeated forceful passes.
Starter Toolkit for Braids and Twists
| Item | Purpose | Use During |
|---|---|---|
| Sectioning clips | Keep unused hair out of your hands | Preparation and installation |
| Wide-tooth comb or detangling brush | Work through lubricated sections | Preparation |
| Spray bottle | Lightly dampen strands when needed | Preparation and refreshing |
| Lightweight leave-in conditioner | Add slip and manageable moisture | Preparation and maintenance |
| Mirror and handheld mirror | Check the back and your parting | Installation |
| Satin scarf or bonnet | Cover the finished style comfortably | Overnight care |
Decide Whether You Want Extensions
Added hair is optional, not a requirement for a finished look. If you choose synthetic hair, ask about material information and available safety disclosures rather than relying on packaging language alone.
A 2025 Consumer Reports test of 10 synthetic braiding-hair products detected potentially carcinogenic volatile organic compounds in every sample and unsafe lead levels in nine, according to its braiding-hair testing report. These findings don't establish the long-term health effects of wearing those products, and prewashing shouldn't be treated as a proven way to eliminate exposure.
Set up a well-lit workspace with tools within reach. Choose self-installation when you can comfortably see and control the sections; choose a stylist when the design exceeds your current skill or available time.
Core Techniques You Can Actually Master
Start by understanding how the sections move, not by trying to copy someone's speed. Practice on an accessible section where you can see your hands and release the hair easily if something feels wrong.
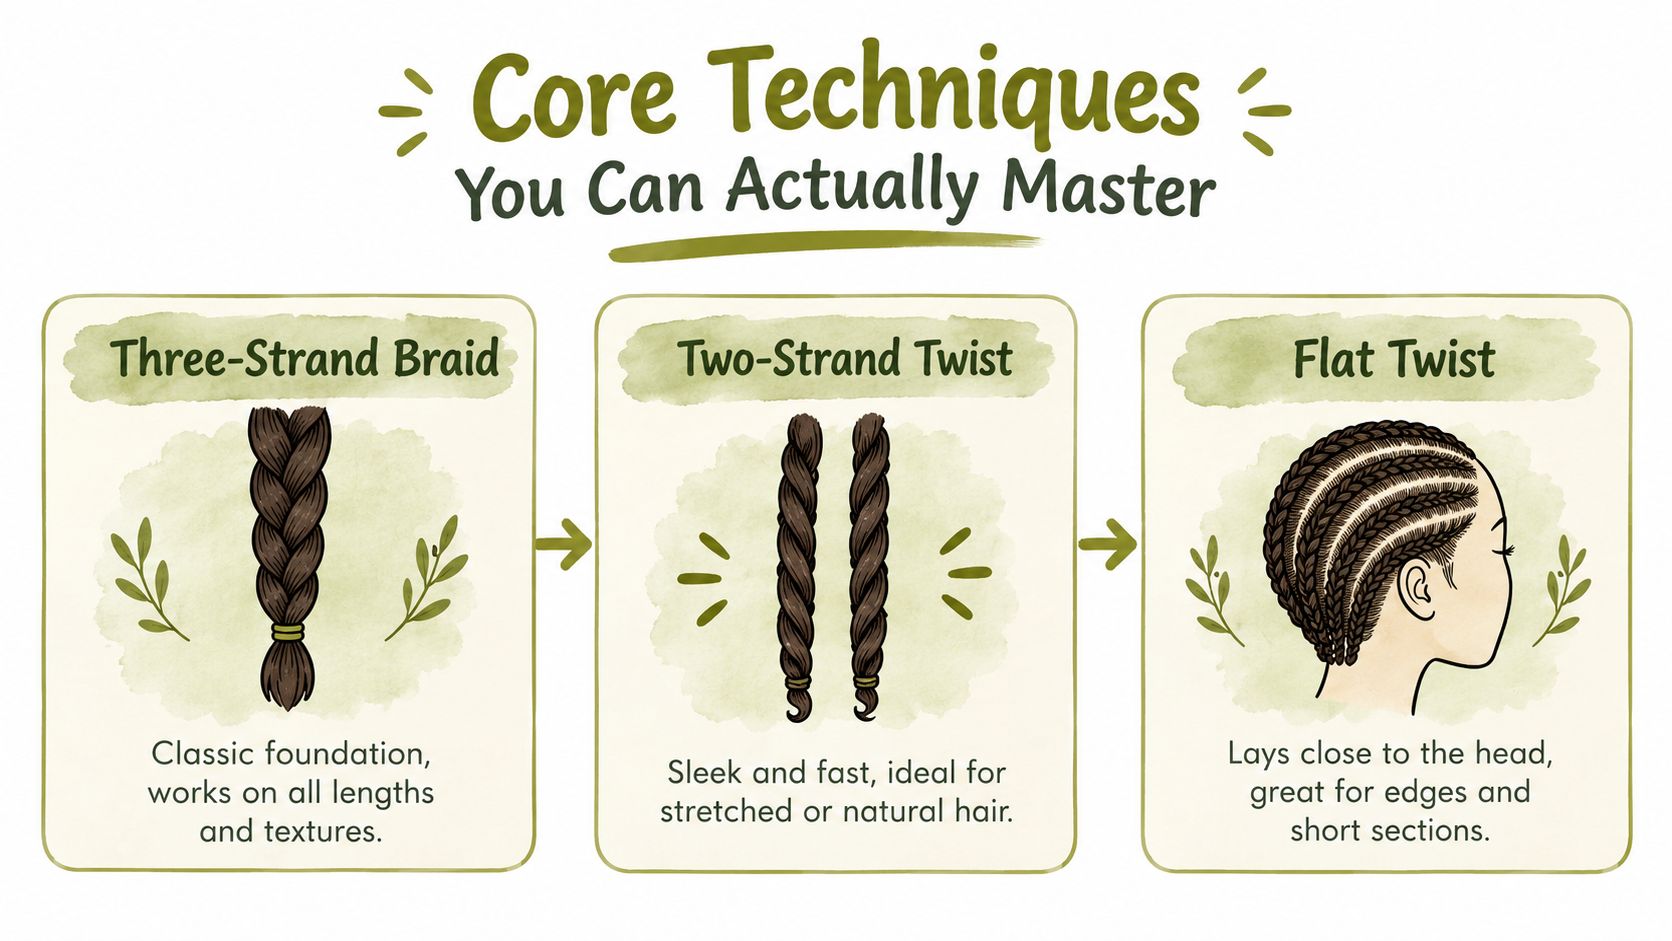
The visual below introduces the basic structures. Treat it as a learning aid, not a promise that every technique suits every length.
Hanging Braids and Twists
For a three-strand braid, divide a detangled section into similarly sized pieces. Hold the pieces separately between your fingers, move an outside piece across the middle, then alternate sides. Reposition your fingers as you travel down the length rather than pulling the whole braid away from your scalp.
Begin with sections large enough to see and handle. Tiny sections require more precise finger control, and they aren't necessary for a polished learning style.
Knotless braids begin with your own hair before small amounts of extension hair are fed into the braid. Keep the added pieces manageable so you can distribute them without creating a bulky attachment. Traditional extension braids start with added hair at the base, which calls for careful control of that initial connection.
For two-strand twists, split a section into balanced halves and wrap them consistently around each other. Keep each half distinct instead of borrowing strands back and forth to compensate for uneven sizing. Smooth the ends gently rather than tightening the roots to make the twist hold.
Techniques That Follow the Scalp
Cornrows use a braid structure while gradually gathering nearby hair into the working sections. Keep your hands near the row, add small amounts from the same defined path, and move along the scalp without lifting the row upward.
Flat twists follow a similar path but use a twist structure. Begin with a small working section, cross the strands, and incorporate nearby hair as you move. Leave the finest perimeter hairs alone rather than forcing them into the row.
- Drifting parts: If your parting keeps drifting, your working section may be borrowing hair from its neighbor. Clip that neighboring section away.
- Uneven ends: Check the starting divisions before compensating midway through the style.
- A tighter finish: Improve the sectioning and finger placement instead of increasing the pull.
A neat part is a visual detail. A comfortable root is a wearing requirement.
You can combine techniques, such as flat twists along the scalp that transition into hanging two-strand twists. The transition happens where you stop adding scalp hair and continue with the strands already in your hands.
A moving demonstration can help you follow the hand changes while practicing at your own pace.
Matching the Style to Your Hair and Lifestyle
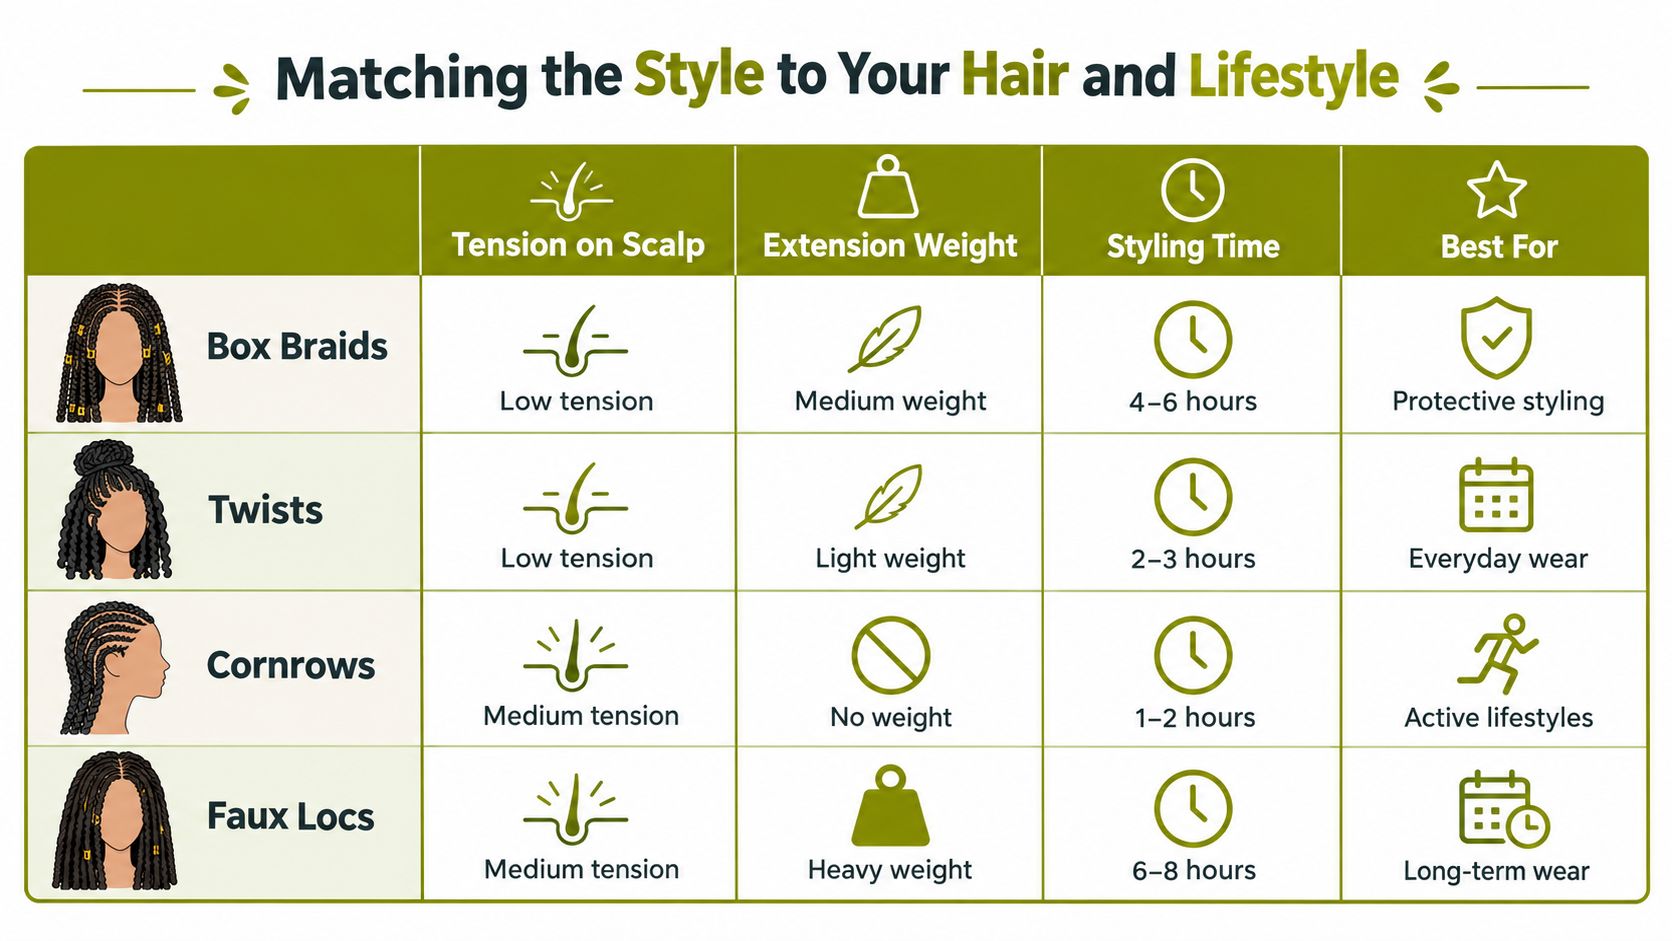
Choose your style around what you can comfortably wear, wash, dry, and take down. A look that suits a vacation may not suit a week of frequent workouts or a schedule with little time for removal.
Use the chart as inspiration rather than a fixed timetable or tension rating. Installation time and comfort depend on the person, section size, added hair, and technique.
Choose by Practical Demands
Instead of ranking styles by appearance, ask different questions about each option:
- Knotless braids: Can the gradual addition of hair produce a comfortable attachment without unnecessary length or volume?
- Traditional braids: Does the structured base feel comfortable, including when you move or gather the braids?
- Crochet styles: Can you access the scalp beneath the attached hair, and do you understand how the pieces will be removed?
- Twists: Would a natural-hair version give you a manageable starting point without committing to extensions?
Hair texture also affects the finish. Tightly coiled hair and looser textures may hold a twist differently, while very short sections may not provide enough length for the hanging look you want. Don't compensate for limited length by forcing a tight grip.
For product planning, this guide to products for dry curly hair can help you think about the care routine underneath the style.
Consider the Whole Styling Cycle
In a 2021 Johannesburg study comparing 15 frequent braiders, defined as more than eight braidings annually, with 15 occasional braiders, frequent braiders had thinner fibers, more visible cuticle damage, significantly weaker tensile strength, and higher traction-alopecia severity scores, as described in the braiding-frequency findings. The practical takeaway isn't to abandon braiding, but to consider repeated installation alongside the finished look.
Ask your stylist about cost, appointment time, washing access, and removal before booking. These belong in the decision, not as surprises afterward.
Terminology deserves care, too. ProMD Health Bel Air's bi-directional threads explained concerns an aesthetic procedure, not hair-threading or twisting, so it shouldn't guide a hairstyling choice.
The suitable option is one you can maintain comfortably and undo patiently.
Week-by-Week Maintenance Without the Buildup
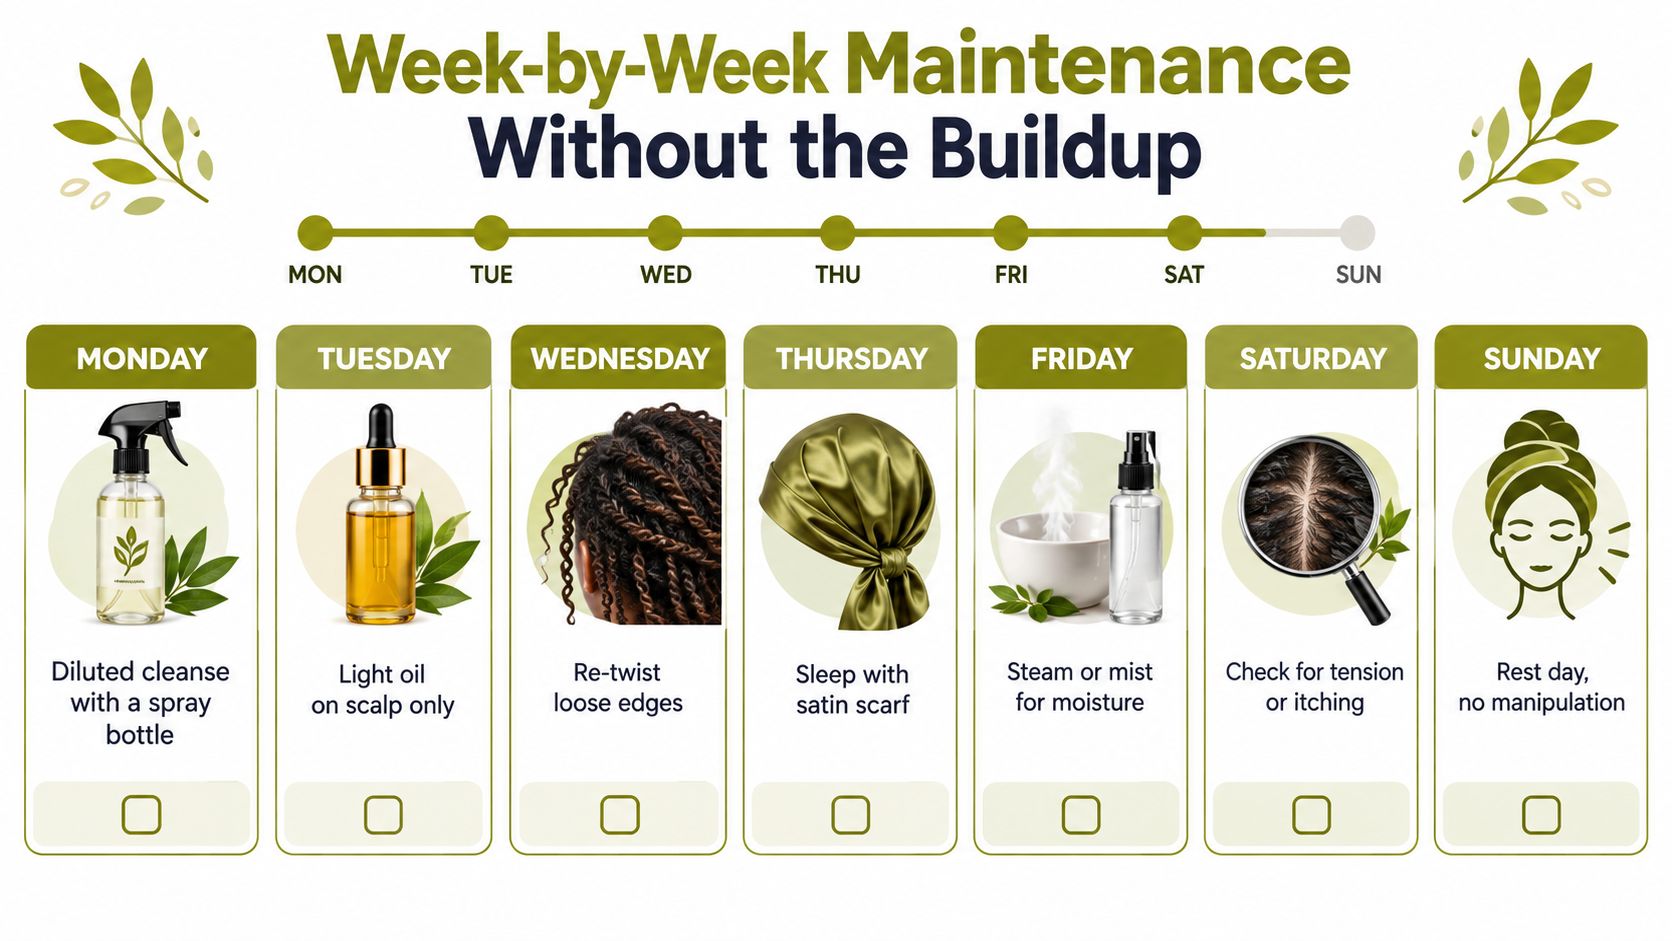
Maintenance should respond to what your hair needs, not force a different product onto it every day. Keep the routine small enough that you can repeat it when work, exercise, and everyday responsibilities compete for your attention.
The schedule below offers possible reminders, not daily requirements. In particular, routine edge retwisting and scalp oiling aren't necessary because they appear on a calendar.
Keep Cleansing Accessible
When cleansing is needed, apply shampoo along accessible parts and use the pads of your fingers gently. If the product directions permit dilution for easier distribution, mix only what you'll use that session. Rinse thoroughly and allow the roots and attached hair to dry before covering or gathering them.
After exercise, don't automatically disguise sweat or odor with fragrance and oil. Check whether your scalp needs cleansing, and leave enough time for drying.
If products seem to sit on your hair, Coil's low porosity hair routine that works is a relevant resource to explore while simplifying your product choices. For coated strands, understanding what a clarifying shampoo is can help you choose a suitable wash rather than stacking on another leave-in.
Refresh Without Rebuilding
A lightweight, water-based leave-in on the lengths is a more manageable starting point than saturating the entire style with oil. Use a small amount, assess the feel, and add only if needed.
- At bedtime: Cover the style with a satin scarf or bonnet that doesn't pull at the hairline.
- For loose pieces: Smooth gently with your hands rather than repeatedly combing the roots.
- For flakes: Look for residue and consider cleansing instead of immediately adding more product.
- For persistent itching: Stop experimenting with layers and reassess the style and products.
Less to maintain: A little softness around the roots doesn't require rebuilding the entire style.
Your routine should keep the scalp accessible and the lengths manageable. It doesn't need to preserve installation-day neatness indefinitely.
Spotting Trouble Before It Becomes Damage
A style labeled protective still deserves regular comfort checks. You shouldn't have to endure a painful adjustment period to earn the finished look.
Pain, stinging, or a headache during or after installation can signal excessive tightness; the American Academy of Dermatology advises loosening painful areas and leaving delicate edges outside the braid in its weave and extension care guidance.
Respond to Signals Early
Look at your hairline and parts in good light, and notice how the style feels when you turn your head or lie down.
- Lingering tenderness or headaches: Ask for the affected area to be loosened rather than waiting for it to settle.
- Bumps, redness, or burning: Stop adding styling products and consider prompt removal.
- Broken edges or widening parts: Move up take-down and seek qualified guidance if the change persists.
- Ongoing itching with synthetic hair: Reconsider the material and speak with a healthcare professional about persistent symptoms.
The synthetic-hair findings discussed earlier are a reason for informed choices, not proof that wearing braids causes cancer. Don't treat washing extensions or covering irritation with oil as a guaranteed solution.
Give the Hairline Room
Leave the finest hairs out, keep finished styles loosely gathered, and avoid forcing short hairs into attachments. For complementary handling habits, review how to prevent hair breakage.
A softer perimeter can still look intentional. Comfort matters more than making every hair lie flat.
Taking It Down and Caring for What Comes Next
Removal deserves the same planning as installation. Set aside unhurried time, arrange your tools, and choose a comfortable place where you can keep track of completed sections.
Don't start cutting extensions unless you're certain where your own hair ends. If you can't identify that boundary, unraveling is the more cautious choice.
Unravel Before You Detangle
Release the attachment or undo the braid or twist first. Support the section near the root, work patiently through the length, and add a product with slip where strands catch.
Once the section is loose, separate it with your fingers before reaching for a comb. Begin at the ends and progress toward the roots, keeping neighboring sections clipped away. A stubborn tangle calls for smaller movements, not a stronger pull.
- Keep sections organized: Loosely secure completed areas so they don't mix with hair you haven't detangled.
- Pause at resistance: Add lubrication and separate the knot gently instead of repeatedly dragging a tool through it.
- Ask for help: If an attachment or tangle won't release, a stylist can help you work through it without guessing.
Cleanse the scalp after removal, condition the lengths, and finish detangling without rushing. Avoid scheduling another detailed installation immediately afterward because your calendar is already open.
Assess and Reset
Loose hairs may become visible together during take-down because they were held within the style. The amount alone doesn't tell you whether everything is fine. Pay attention to persistent scalp discomfort, noticeable changes at the edges, or areas that look different from your usual baseline, and seek professional advice when needed.
The American Academy of Dermatology recommends limiting extensions and weaves to roughly two to three months of continuous wear before switching to a looser style, according to its hair-styling guidance. That's guidance for extensions and weaves, not a target every braid or twist should reach.
Choose a low-tension interval afterward, such as loose braids under a scarf or a simple twist-out. Let your next choice reflect what you noticed during wear and removal.
Braids and twists are tools, not destinations. A sustainable routine includes preparation, comfortable wear, patient take-down, and room to change your approach.
ArtNaturals offers shampoos, conditioners, and plant-oil haircare options for building an everyday care routine around braids and twists. Visit ArtNaturals to explore products by ingredient and hair concern, and choose a simple cleansing-and-conditioning foundation for your next style.