

The most popular advice about dry hair is also the least helpful. You're told to find the richest, most natural oil and use more of it, more often, everywhere. That approach leaves fine hair limp, low-porosity hair greasy, and an irritated scalp no better than before.
The best hair oil for dry hair isn't one winner. It's the oil that matches the actual source of your dryness, whether that's rough surface texture, fragile porous lengths, thirsty ends, or scalp comfort. Start with the job you need done, then pick the oil that does that job well.
Quick Picks for Dry Hair at a Glance
Five oils cover most dry-hair goals when each one is matched to the right job. Read the table by job, and treat every row as a specialist. Each oil below does one thing particularly well, and it will disappoint you if you ask it to do a different one.
Quick Picks for Dry Hair by Oil
| Oil | Main trait | Best fit for dry hair | Typical use |
|---|---|---|---|
| Coconut oil | Penetrates the hair fiber; strongest pre-wash evidence | Brittle, porous or chemically stressed lengths | Pre-wash treatment, a few hours to overnight |
| Argan oil | Lightweight, smoothing finish | Dry ends, frizz, medium to thick hair | 1-2 drops on dry hair |
| Jojoba oil | Wax ester, close in feel to natural scalp oil | Dry scalp comfort, fine or mixed hair | 2-4 drops on damp scalp or ends |
| Sweet almond oil | Soft, light emollient | Everyday softness on medium hair | 2-4 drops on damp lengths |
| Castor oil | Thick and viscous | Thick, coily or very dry ends | Small amount on ends only |
Use this as a starting point rather than a final answer. If your lengths snap easily and feel brittle after washing, a coconut oil pre-wash step fits better than any finishing oil. If your hair behaves after conditioning yet turns frizzy by midday, argan oil on the ends usually does more than extra oil at the roots.
Climate shifts these choices too. Heat, sun and dry air pull moisture from lengths faster and shorten how long color stays fresh, so your environment, wash frequency and styling habits all set how much oil your hair tolerates. For anyone who colors their hair in a hot, dry place, the coloring technique itself matters as much as the aftercare, and this comparison of Dubai climate and hair color choices lays out the trade-offs between balayage and highlights in that situation.
Practical rule: Pick one oil for one job, test it for two weeks, and judge it on softness and buildup, never on how natural it sounds.
I'd start with the row that sounds most like your hair today. Two weeks on one well-matched oil teaches you more than a shelf of half-used bottles ever will.
How Hair Oil Softens and Protects Dry Strands
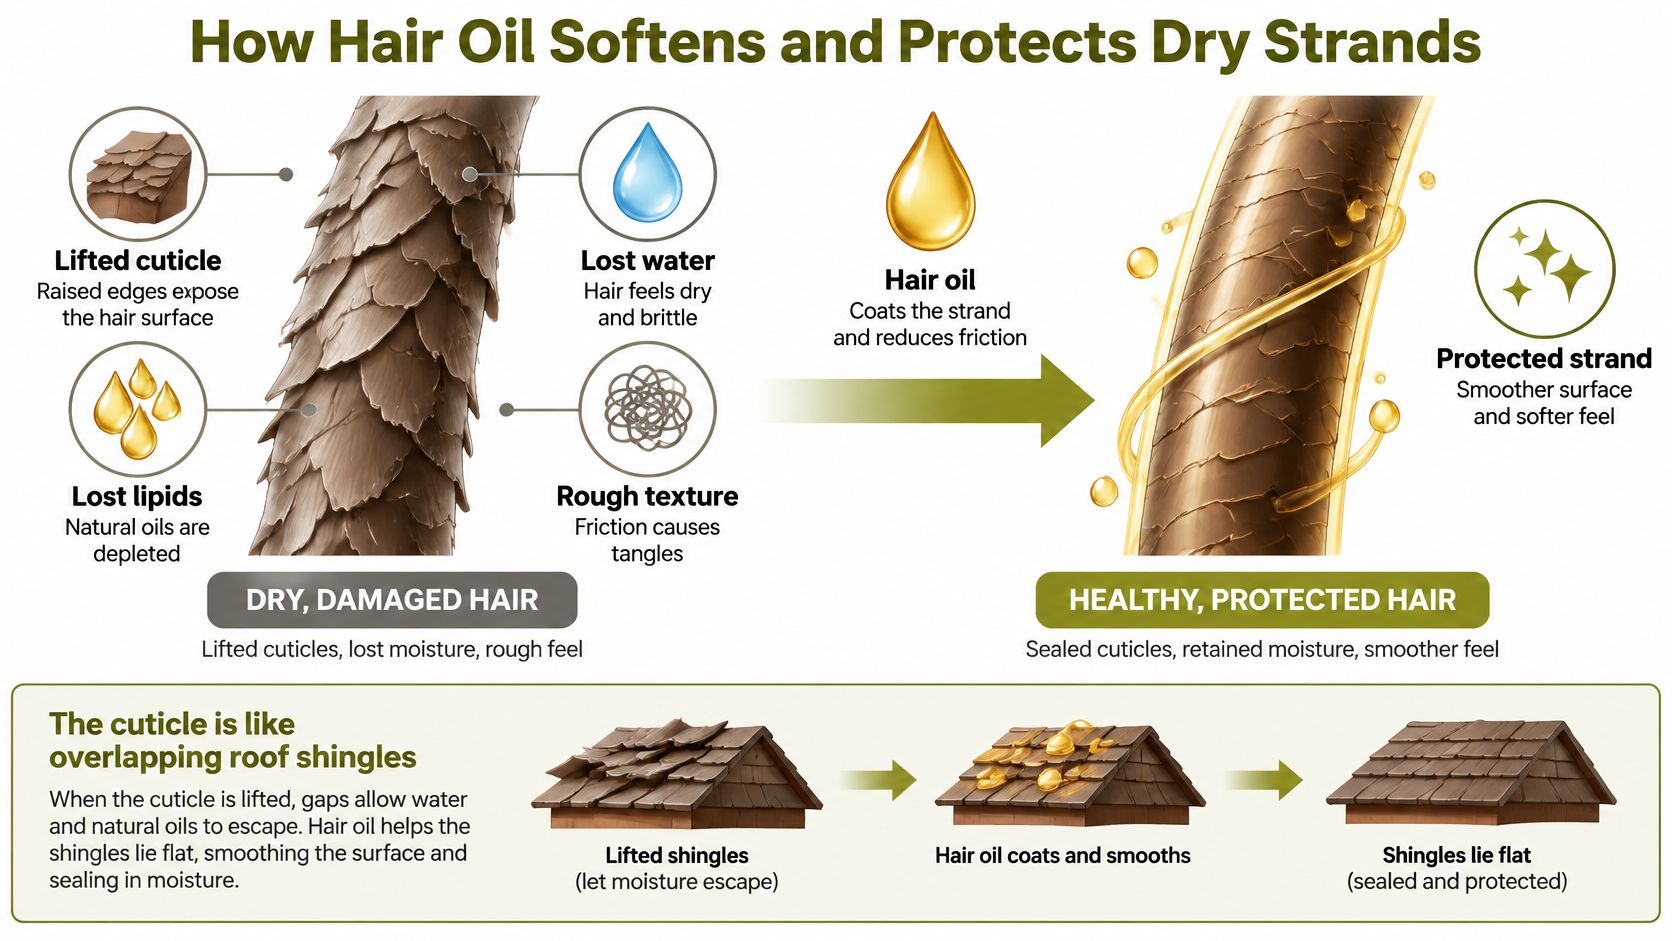
Dry hair isn't just hair that needs more product. It's hair whose outer layer, the cuticle, has lifted and lost some of its natural lipids and water. Raised cuticle edges catch on each other, so strands feel rough, tangle easily, and look dull because light scatters off an uneven surface.
Think of the cuticle as overlapping roof tiles. When the tiles lie flat, the surface feels smooth. When they lift, friction increases every time you brush, towel dry, or run your fingers through your hair.
The diagram below shows how a thin oil film smooths that surface and helps the strand hold onto moisture.
Two Ways Oil Helps Dry Strands
First, oil forms a surface film that adds slip. Strands glide past each other instead of snagging, which means less friction during detangling and a smoother, shinier finish. Most finishing oils work mainly this way, and a drop or two is usually enough.
Second, some oils move into the fiber itself. Coconut oil is a triglyceride rich in lauric acid, with a relatively low molecular weight and straight chain that gives it an affinity for hair proteins, and a radio-labeling assessment summarized by Cosmetics and Toiletries magazine estimated that approximately 15-20% of the applied coconut oil penetrated after 1 hour, increasing to about 20-25% after 6 hours.
That penetration sets it apart from oils that stay on the surface. In comparative hair-fiber research indexed by PubMed, coconut oil was detected within the hair while mineral oil was not detected in the cross-section, and sunflower oil showed more limited penetration because its linoleic-acid triglycerides have a bulkier structure. Inside the fiber, oil can reduce water-related swelling during repeated wet and dry cycles, which matters for porous, fragile lengths.
Heat changes oil behavior as well. In one experiment indexed by PubMed on capillary adhesion, heating reduced adhesion for coconut and sunflower oils, consistent with oil moving into the fiber and leaving a thinner surface film, while mineral oil showed no such change. Gentle warmth may help some oils spread, but stronger heat isn't automatically better for dry hair.
The short video below walks through how oil interacts with the strand surface in a routine setting.
One limit matters. Oil doesn't add water by itself. It slows moisture loss, which is why applying it to damp hair often feels better than layering it onto completely dry hair. Oil conditions and protects the hair you have, improving softness and manageability. It doesn't permanently change your hair or create new growth, so judge it on feel and ease of styling.
Carrier Oils and Essential Oils, Explained Simply
Confusion between these two families causes most DIY mistakes. A carrier oil is the glass of water. An essential oil is a concentrated drop of flavor you add to it. You wouldn't drink the concentrate straight, and you shouldn't apply an essential oil straight either.
Carrier oils are pressed from seeds, nuts, or fruit. Coconut, argan, jojoba, sweet almond, and castor oils all belong here, and they do most of the conditioning work on your hair. They provide the slip, softness, and surface film that dry strands need.
Essential oils such as rosemary, lavender, peppermint, and tea tree add scent and concentrated plant compounds. They're potent in very small amounts, which is exactly why they need careful dilution in a carrier before they touch skin or scalp. More drops don't mean better results. They usually mean more risk of irritation.
A Simple Label Checklist
- Carrier first: Check that a carrier oil appears first in the ingredient list, since that tells you what's doing the main conditioning work.
- Named scent ingredients: Note whether fragrance or specific essential oils are listed, so you know what you're putting near your scalp.
- Scent you enjoy: Match the aroma to your preference rather than to a promised result, because you'll use a product consistently only if you like how it smells.
- Clear purpose: Decide whether the product is meant for hair lengths, scalp, or both, and don't assume one blend suits both jobs.
If you want to build your own blend, start with a single carrier and add scent only if you miss it. Our guide to choosing carrier oils for essential oils walks through pairings and textures in more detail. ArtNaturals sells both carrier oils and essential oils, so you can keep the base simple and adjust one element at a time.
A good carrier-first example is the Argan Essential Carrier Oil, 4 oz, which is suited to all skin and hair types. Used on its own, it works as a light finishing oil for dry ends. Used as a base, it carries a drop of essential oil without overwhelming fine or medium hair.
If a label leads with fragrance and you can't tell which carrier oil is inside, keep looking. For dry hair, the base matters more than the scent.
Matching Hair Oil to Your Dry Hair Type
Start with a quick self-check before you buy anything. Hair that absorbs water and product quickly, then feels dry again within hours, often behaves like high-porosity hair. Product that sits on top, beads up, or feels greasy after a tiny amount often points to low-porosity hair that resists absorbing oil.
Fine hair gives you another clue. If a pea-sized amount makes your hair look weighed down, you need lighter oils and smaller doses, not richer ones. And if your scalp flakes or itches while your ends feel fine, that's a scalp question, not an ends question, so it needs a different approach.
Matching Hair Oil to Dry-Hair Situations
| Hair situation | Look for | Use with care |
|---|---|---|
| Fine, low-porosity hair | Light oils such as jojoba or argan, 1-2 drops | Heavy castor or thick blends can weigh strands down |
| Coarse or high-porosity hair | Coconut oil as a pre-wash step, then a small finishing amount | Layering heavy oil on dry hair without cleansing |
| Curly or coily dry hair | Sealing oils applied to damp lengths and ends | Buildup near the scalp and on fine sections |
| Color-treated or bleached hair | Pre-wash coconut oil before shampooing | Hot tools used over oiled hair |
| Dry scalp | Unscented jojoba in a light amount on the scalp | Essential oil blends applied directly to skin; persistent flaking needs a professional |
| Frizzy, rough dry ends | Argan finishing oil rubbed through the palms | Applying to roots, which can make hair look limp |
Read each row as a starting point, not a promise. Curly and coily hair often needs oil applied to damp lengths in sections, because natural scalp oil travels slowly down a curved strand. Straight, fine hair usually needs the opposite, a single drop worked through the palms and pressed only into the last few inches.
If you're weighing the two most common choices, our comparison of coconut oil and argan oil for hair breaks down texture and timing side by side. For readers who prefer a blended, ready-to-use option, the Biotin & Collagen Hair Oil, 4oz costs $16.95 and is suited to all hair types, which makes it a simple benchmark against single-ingredient oils.
One caution sits outside the table. If scaling, redness, soreness, or heavy shedding persists, that's beyond what an oil can address, so consult a healthcare professional rather than adding more oil. One oil rarely fits every row, so pick the situation closest to your hair and test that choice over two weeks.
Patch Testing and Safe Dilution for Scalp and Strands
Natural doesn't automatically mean gentle. A recent review available through the University of São Paulo repository warns that undiluted essential oils can irritate or sensitize the scalp, with higher risk on damaged, inflamed, or diseased skin, and recommends dilution in a carrier substance. Allergic reactions and respiratory irritation are also possible, especially in small, enclosed spaces with strong scent.
Choose a light, unscented carrier such as jojoba or sweet almond oil for anything that touches your scalp. Check that the carrier is listed first on the label, and keep scalp blends simpler than hair-length blends. Your lengths tolerate more experimentation than your skin does.
Conservative Dilution Ranges for Hair Oil Use
| Use | Conservative range | Safety note |
|---|---|---|
| Essential oil in a hair-length oil | 1 drop per 10 ml carrier, about 0.5%, up to 1 drop per 5 ml, about 1% | Start at the low end and patch test first |
| Scalp-directed blend | Under 1% | Avoid broken, irritated or inflamed skin |
| Pure carrier oil on hair | No added dilution needed | Still patch test for allergy |
| Finishing drops on dry ends | 1-2 drops in total | Keep away from eyes and face |
Our reference on essential oil dilution ratios gives measured guidance if you're mixing at home. Measure with a small bottle and a dropper rather than guessing, because drop size varies and it's easy to double a blend's strength by accident.
How to Patch Test
Apply a small amount of your diluted blend to your inner elbow or behind your ear. Wait 24 to 48 hours without washing that spot more than usual. If itching, redness, or swelling appears, don't use the blend on your scalp.
Avoid use near your eyes and on broken skin. If a strong scent bothers your breathing, stop, rinse, and move to fresh air rather than pushing through. A product you have to endure isn't a good fit, whatever the label says.
Watch for buildup, too. Frequent heavy oiling can leave fine or low-porosity hair looking greasy rather than moisturized, and the fix is usually less oil, less often, not a stronger cleanser. If redness, pain, scaling, or heavy shedding persists, stop and speak with a healthcare professional instead of adding another product.
How to Apply Hair Oil on Dry Hair
Timing matters as much as the oil itself. The same bottle can feel wonderful as a pre-wash treatment and far too heavy as a leave-in, so pick your method first and your amount second.
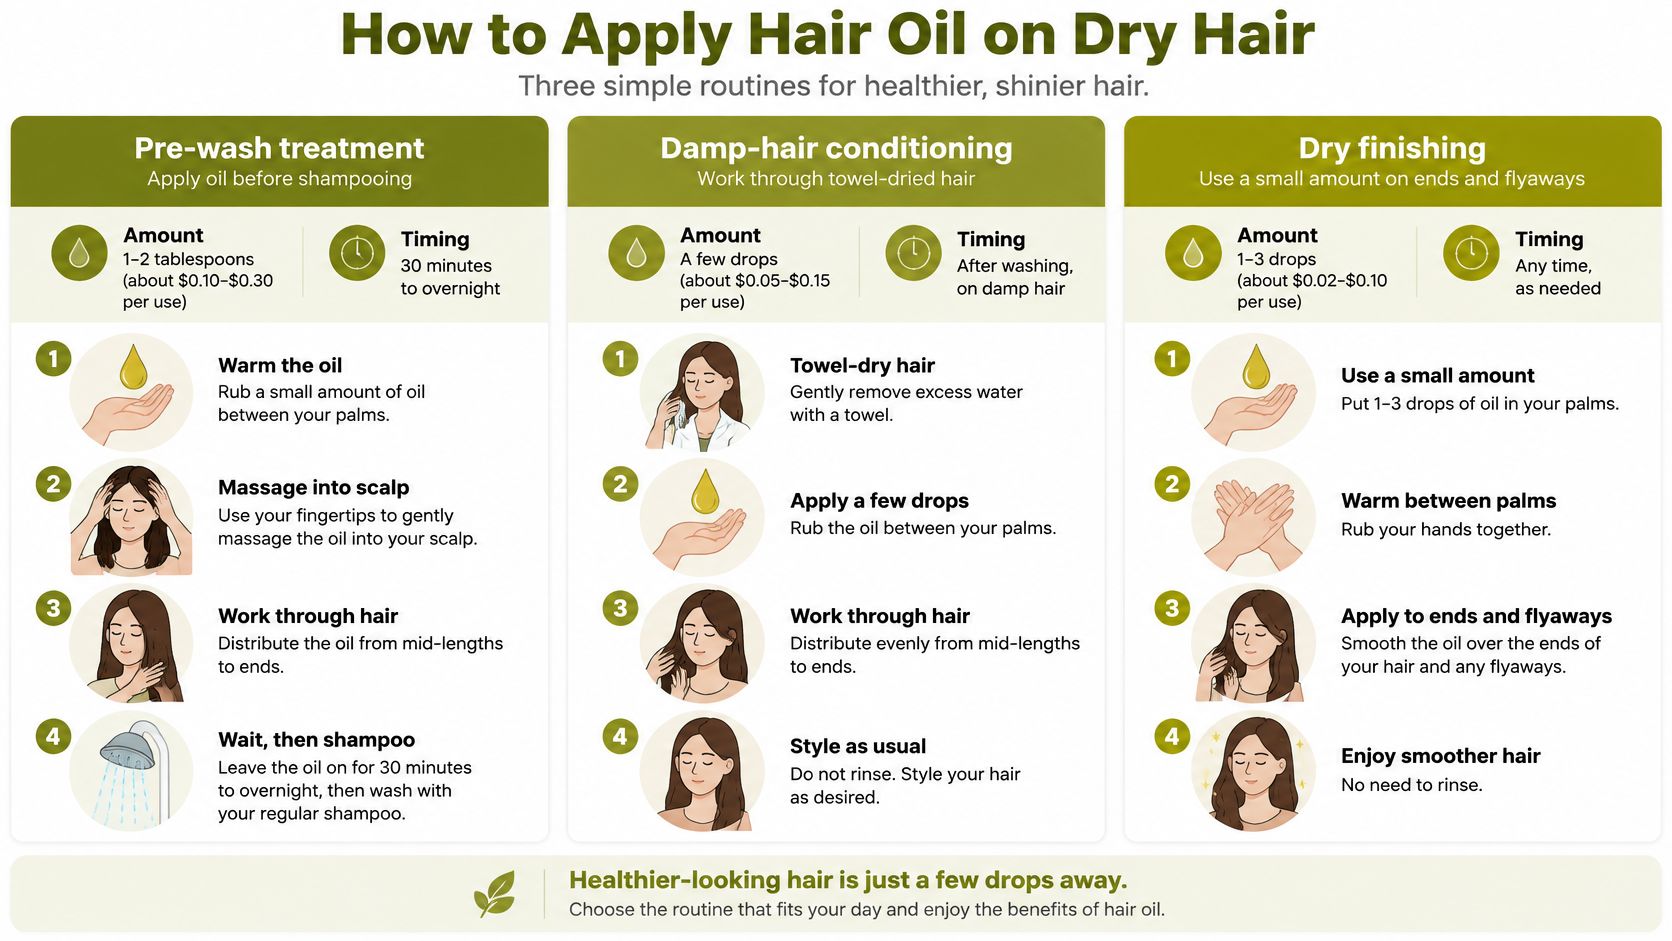
Application Methods, Amounts and Timing
| Method | When to use | Typical amount | Timing |
|---|---|---|---|
| Pre-wash treatment | Once or twice a month, or as part of a routine | 1-2 teaspoons for shoulder-length hair | 30 minutes to overnight, then shampoo twice |
| Damp-hair conditioning | After shampooing, before drying | 2-4 drops on ends and lengths | Leave on until rinsed, or leave in |
| Dry finishing | On dry hair when frizz or roughness appears | 1-2 drops total | No rinse needed |
The infographic below summarizes the three routines so you can keep amounts and timing straight at the sink.
For brittle, porous lengths, the pre-wash method has the strongest rationale. In a Journal of Cosmetic Science study available through the Society of Cosmetic Chemists library, coconut oil was the only tested oil, versus mineral and sunflower oils, to significantly reduce protein loss from both damaged and undamaged hair when used as a pre-wash treatment, and its performance was stronger before washing than after washing. That's a conditioning and damage-reduction finding, not a promise of permanent repair or new growth.
Pre-Wash Method Step by Step
- Warm a small amount between your palms rather than heating it in a microwave, so it spreads evenly without hot spots.
- Section your hair and apply to lengths and ends, keeping your scalp free unless it's specifically dry.
- Cover with a shower cap and leave it on for 30 minutes to overnight if that's comfortable for you.
- Shampoo thoroughly, then condition, using a second shampoo round if your hair still feels coated.
For damp-hair conditioning, towel dry first so water isn't dripping off your strands. Work 2-4 drops through ends and lengths, then detangle gently with a wide-tooth comb. Applying to damp hair helps the oil slow moisture loss as your hair dries, instead of sitting on top of already dry strands.
Dry Finishing and Frequency
- On dry hair, rub 1-2 drops through your palms until they look almost empty, then smooth from mid-length to ends.
That nearly invisible film is the point. If you can see oil on your hands, you'll see it on your hair. Gentle, indirect warmth from your palms or a warm towel may help some oils spread, while strong heat isn't automatically better, so avoid hot tools over oiled hair.
Use a pre-wash treatment once or twice a month for dry, porous, or bleached hair, and add finishing drops only when frizz or roughness appears. If your hair looks limp or greasy by evening, reduce the amount before you change products. Complete a patch test before your first use of any new oil or blend.
Choose Your Dry Hair Oil and Start a Two-Week Test
A shelf of oils makes the decision slower, not better. Pick one likely match, keep the rest of your routine steady, and give it fourteen days of honest notes before you judge it.
A Three-Step Decision Framework
Step one, name the source. Surface roughness, fragile lengths that snap, scalp comfort, and dry ends call for different use. Hair that feels soft after washing but rough by morning points to ends and finishing. A tight, itchy scalp points to comfort, and any oil used there has to earn its place.
Step two, pick one oil and one method. Choose a single carrier-first option from the quick-pick table and pair it with one routine: pre-wash, damp-hair, or dry finishing. Hold off on combining methods in week one, because a mixed result tells you nothing.
Step three, test for two weeks. Change one variable at a time. If week one feels slightly heavy, keep the same oil and method in week two and halve the amount before you switch products. If it still looks coated after that, the oil itself is the mismatch.
Your Weekly Scorecard
Score each area from 1 to 5 at the end of each week. A simple note on your phone works fine.
- Softness: Does your hair feel smoother between washes, or only right after application?
- Tangling: Does a comb move through your lengths with less snagging and pulling?
- Shine: Does your hair look healthier in normal light, without looking wet or separated?
- Buildup: Does your hair feel coated, limp, or harder to cleanse than before?
- Scalp comfort: Does your scalp feel calm, with no new itching, redness, or flaking?
- Irritation: Did any stinging, swelling, or sensitivity appear after use?
If buildup shows up, reduce the amount or frequency first. That fix costs nothing, and it keeps the test clean. If irritation appears, stop, let your skin settle, and patch test again before considering a different oil.
A good oil should make your routine easier by week two. If you're washing more often just to remove it, the amount or the oil is wrong for you.
For a ready-made starting point, the Jojoba Essential Carrier Oil, 4 oz (118ml) has a sale price of $16.95 and is listed as suited for all hair types. It's carrier-first, which makes it easy to test on both lengths and scalp. The Keratin Strengthening Hair Oil, 4 oz costs $14.95 if you'd rather compare a dedicated hair oil with a single carrier.
Treat both as options to measure against your scorecard, as candidates rather than promises. Prices are shown in USD with tax included, and shipping and discounts are calculated at checkout. Your two-week notes carry more weight than the label when deciding what earns a permanent place in your routine.
If you're ready to run the test, ArtNaturals lists carrier oils, hair oils and essential oils alongside its wider haircare range. Choose one carrier-first oil that matches your dryness source, patch test it, and let the scorecard guide your next step toward softer, more manageable hair.